At Trustious, our test suite used to run on a single machine for about 12 hours. We then tried parallelizing the run on three machines. The run took on average about 4 hours. The results were still not satisfying to us so we started building our in office test cluster.
We added two more machines to our cluster but it didn’t make a big difference. The problem is that running a single worker/core on each machine doesn’t fully utilize the machine’s resources. We wanted to run tests in parallel even on a single machine.
When parallelizing on a single machine you need to take care of database write conflicts, elasticsearch write conflicts, and if you are running multiple spork instances (a DRb server that we use to speed up starting tests) then you’ll also face port conflicts. It’s a headache handling all of these conflicts. We needed some kind of isolation. Our workers needed to act as if they are running on different hosts.
Virtualization is the keyword. Virtualization will solve the conflict problems perfectly, but there is a problem which is the overhead added by the virtual machines on the servers. That’s when we found out about Docker. “Docker uses resource isolation features of the Linux kernel such as cgroups and kernel namespaces to allow independent “containers” to run within a single Linux instance, avoiding the overhead of starting virtual machines.” - Wikipedia. Docker is exactly what we were searching for so we started using it to build our framework.
Architecture
Preparing Docker Perquisites
If you are new to docker, it may be a good idea to read the docker terminology section in this post.
First of all, we need to prepare our docker image. The docker image should contain all the dependencies needed for the test run. We started building our Dockerfile from rails (yes you can reuse other containers with docker!), bundling gems, chrome driver, and other tools/binaries needed for the test run. It’s not logical for the workers to build the whole Dockerfile with each run, for that reason docker has the concept of repositories. Repositories store pre-built images for faster usage and access.
To make the process even easier for the workers we extended our environment’s container with another container containing some test data. The built image was so large that it became infeasible to host it on the official docker repo, docker hub, due to the bandwidth needed for updating and pulling the image. We decided that we will host it in a local docker registry. Fortunately there’s a docker image for local registries (or the newer version), so we pulled it and set it up on one of our cluster’s machines. After the docker related things were ready, we could proceed to the next step.
Triggering the Job
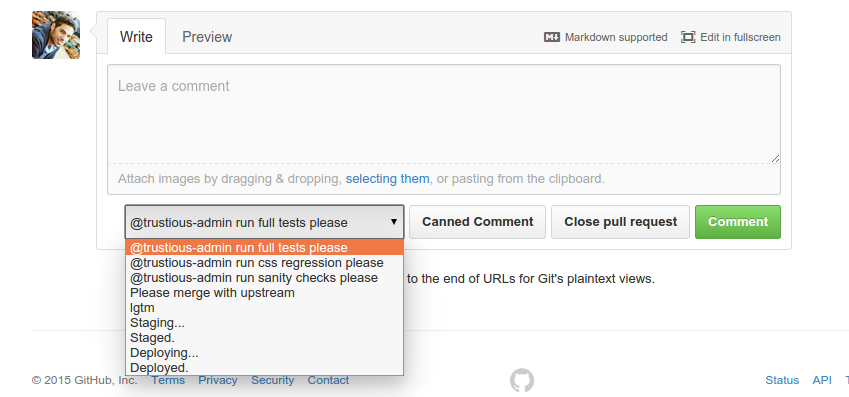
Triggering a test run is as easy as commenting on the pull request you need to test on Github with “@trustious-admin run a full test please”.

Jenkins, the famous continuous integration tool, listens in the background for that pattern and starts the full tests for Abdo.
Starting The workers
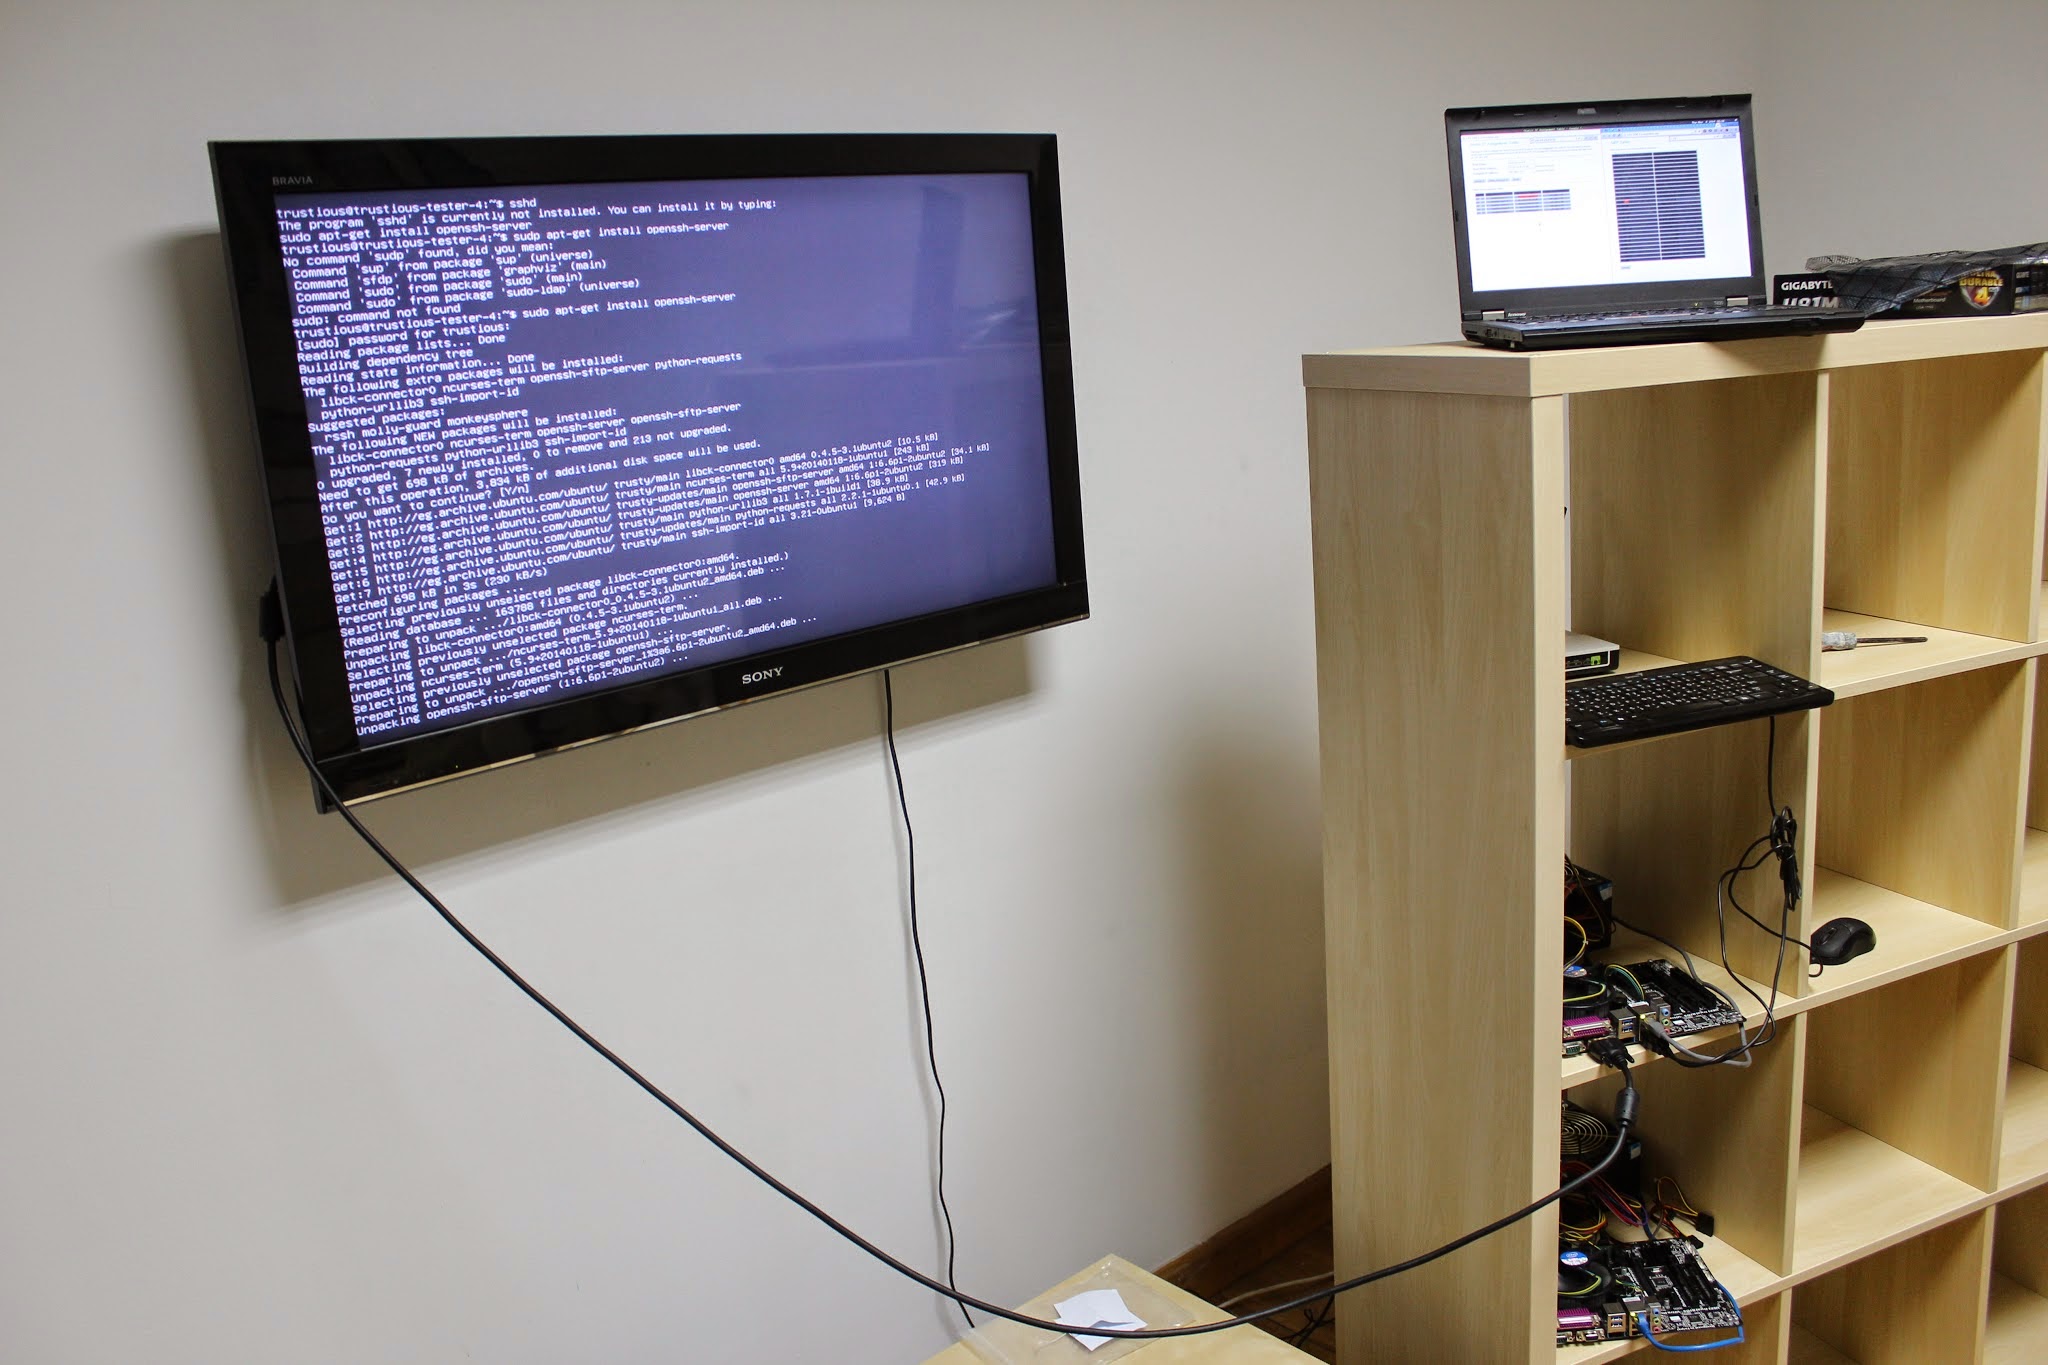
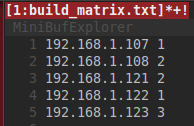
The first thing in the process of the full tests is starting our workers. The workers are started based on the build matrix in the root directory. The build matrix is a file that contains the IP of our cluster machines and the number of workers to run on each machine. For each worker a process on the server is spawned. Each process connects to the worker using an SSH connection and pipes its output to a file named with the worker id. Each worker first pulls the new docker image, if any, runs it and starts contacting the server; which we will talk about in the next section, to run the tests.
Starting the test server
The server starts a dry run to list all the tests to run and filters them by the regex given, if any. Now that it has the tests to run, a very simple nodejs server starts queuing those tests and listening for requests. The server responds to workers request with one test at a time. The worker then runs this test, logs the result to stdout and then contacts the server again for another test. After all the tests are sent to the workers, the nodejs server exits and waits for the workers, its subprocesses, to finish. Once a worker finishes, it tries to contact the server several times to make sure that it finished and then exits.
Aggregating Results and handling Flaky Tests
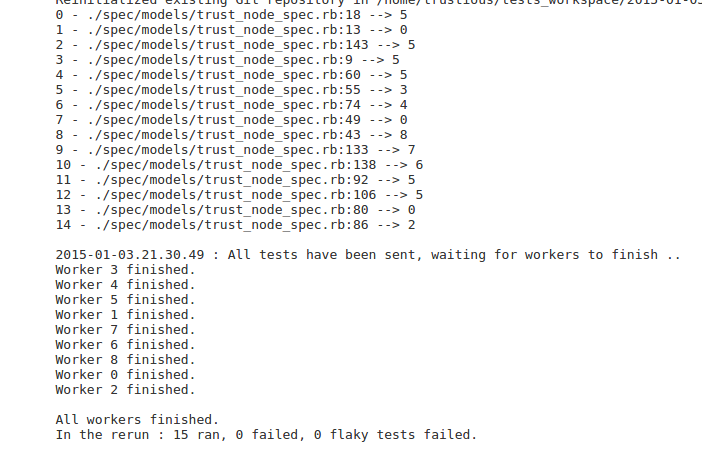
Once all the workers are done, the server continues with aggregating the results. Remember that the SSH output of all workers is redirected to files on the server. Now it’s time to parse those files, and aggregate the results from each worker with a simple python script. The python script compares the results with the original list of tests. Tests that are missing for some reason, maybe due to a node failure, are reported as failures.
If the percentage of failures to the number of original tests is under a certain threshold, 10% for example, a new test run for those tests only is started. The reasons we do this are the flaky tests and node failures. Flaky tests are tests that behave differently under certain conditions, like a heavy load on the test machine for example. Also, if a node fails while running a test, this test will be missing and reported as a failure, so we need to re-run those tests. This percentage usually results in one or two more test runs.
Reporting Results
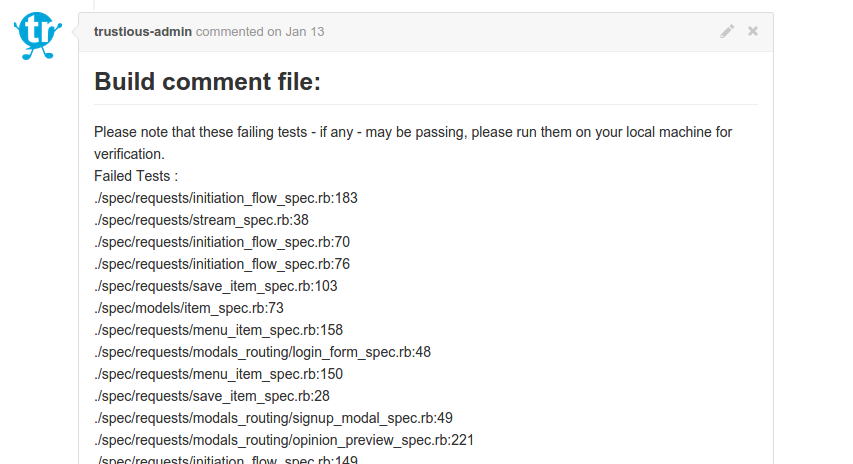
After two or three test runs, the final list of failed tests is ready. Jenkins takes this list and reports it back to Github with a comment.
Problems Faced
Handling Worker Failures
Workers may fail for many reasons, like a power outage, network issues or any other reason. We need to make sure that once the worker is back it joins the test run. We don’t want to lose this worker. Since we have a certain process for each worker, we can detect its failure easily. If the SSH connection is closed while there are still some tests in the queue, this means that the worker got disconnected. The process then waits five seconds and then tries connecting to it again and so on until it’s back online.
Rspec Results Format
As we mentioned before, rspec test results are dumped to stdout for each test. The problem is that by default rspec results are hard to parse and it’s hard to extract the failures. We decided to go for a JSON formatter but our rspec’s version doesn’t have it. Fortunately you can write your own formatter and the rspec-core is oper source, so here is the JSON formatter’s source code ;)
Rspec Dry Run
Dry run is needed for the server to list all the tests we had. It was there in earlier versions of rspec but then removed. So we hacked it in our way.
if ENV['FAIL_ALL']
  config.before(:each) do
    raise 'Fail each test immediately'
  end
end
Then you can start the dry run by FAIL_ALL=true bundle exec rspec spec. All tests will fail immediately.
Many Failures
Missing tests are reported failed with this error message "Example didn't run because of a timeout or a drop". We had many of them. Whenever you try to run them locally, they will pass. We always thought that those tests are flaky and that they fail because of the timeout we set. The problem was that they are not the same each run. This was one of the hardest problems we faced until we noticed that those tests were not in any of the logs of any of the servers although it was reported that it was assigned to a certain server. So somehow one of the workers started a request and it hit the server but the test itself was never sent to the worker for some reason. At first we had this as our server :
cat $TESTS_FILE | while read x; do TMP=`echo "$x" | ncat -l $SERVER_PORT`; echo "$TEST_COUNTER - $x --> Worker $TMP"; let TEST_COUNTER=TEST_COUNTER+1; doneApparently the problem was a parallelization problem. This code doesn’t seem good for multiple workers hitting it at the same time. So we wrote a very simple nodejs server and replaced this line with
nodejs server.js $TESTS_FILE $SERVER_PORTAnd problem solved! Finally!
Virtual Frame Buffer
One last problem we faced was that all of our frontend and interaction tests were failing. It was easy to spot that the problem was something related to those tests since all of them were failing. After some googling, we found that our chrome driver needs a virtual frame buffer to run and it wasn’t there by default in our docker image. Installing the xvfb and starting it fixed that problem.
Things that could have been better
Bash
One of the things that surely could have been much better was choosing bash for this project. Bash makes dealing with SSH connections, docker, subprocesses and unix commands very easy. But it doesn’t seem to be the correct scripting language for such a big project. There are many docker libraries for many languages and there are better ways to deal with the workers other than SSH.
Message Passing
The idea of connecting to workers with SSH and logging their stdout to a file is easy and very simple but ugly. We could have made a better protocol for the communication between the server and its workers. Message queues, such as rabbitmq, could have been used to queue tests and their results back. This could have lead to a cleaner and more robust system.
Master Failure
Currently the system is tolerant to worker failures as mentioned before. Network failures is not also a problem for the master as it reconnects normally to its workers. But currently if the master fails, due to a power outage for example, the whole process stops and jenkins reports a failure to the complete process. We can tolerate this as it’s not very common and also repeating the test run is not as big of a deal as letting the system be tolerant to master failures.
Service Discovery and Scheduling
Currently the workers IPs are hardcoded in the build matrix and the number of workers on each machines is specified manually. Service discovery tools could solve the IPs problem and other tools like Apache Mesos could make the scheduling thing more dynamic. But it’s an over-kill for a cluster of 5 machines.
Bonus
The Development Environment
One of the things we got as a bonus while building this test framework is our Dockerfile. Usually our new developers spend their first days setting up the environment and installing the tools and those things. With this pre-built docker file, developers can instantly start their development environment by pulling the development image from our local registry and can now focus on more interesting things in their first days ;)
The Canned Comments Plugin
Since our tests, and many other jenkins jobs, are triggered by comments on pull requests, @matefh developed this awesome chrome plugin for us!
With this architecture we took down the test run time from 4 hours for a single run to 1.5 hours for the main run and its re-runs! And there is still more room for improvement.
Your comments, questions and ideas are welcomed!
I want to thank @saherneklawy and @SaraAlaaKhodeir for reviewing the post. Thank you!